Embracing the Crunch: Mastering Heat Treatment and Geometry for SKD61 and Nitrided Steels
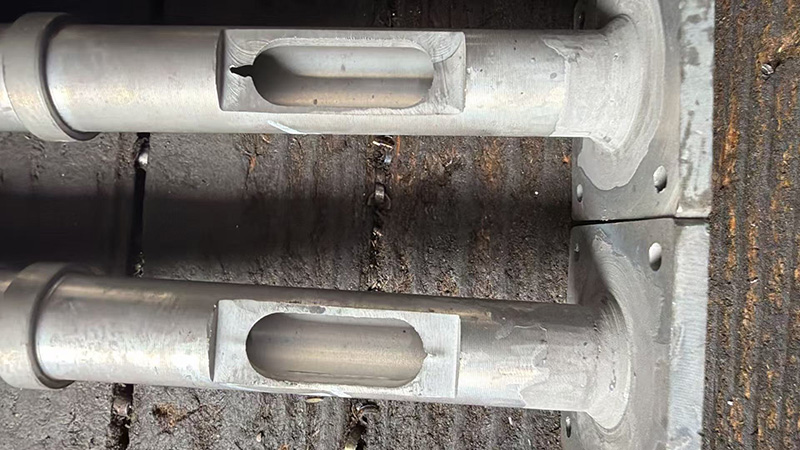
In hardware manufacturing, there is a painful moment every engineer knows too well: picking a precision-machined part out of the post-heat-treatment bin, only to find a clean, devastating crack running right through a critical feature.
At RobotDigg, we support developers and industrial scaling teams worldwide who design custom components for high-stress environments—such as 3D printer extruders, injection molding machinery, and robotic joints. Two of the most reliable methods for achieving extreme wear and thermal resistance are Nitriding (surface hardening) and utilizing SKD61 (H13) tool steel with a full quench.
Yet, both processes share a hidden trap: geometric vulnerability. If your part has thin-walled sections transitioning into heavy bases, improper heat treatment will turn your precision steel into fragile glass.
The Root of the Problem: Unbalanced Internal Stress
Whether you are diffusing nitrogen into a surface or forcing a phase change via quenching, hardening steel relies on expanding its crystal lattice. When a part features a thin-walled section directly adjacent to a thick section, this expansion happens at different rates and times, creating an internal tug-of-war.
Where these two worlds meet—usually at a sharp 90-degree milled step, slot, or keyway root—stress concentrates exponentially. If the localized tension exceeds the ultimate tensile strength of the material, it cracks right along the boundary line.
Case Study 1: The Thin-Wall Nitriding Disaster
Nitriding infuses nitrogen atoms into the steel’s surface at around 500-550C, creating a super-hard nitride layer (900-1100HV). This layer naturally wants to expand, which creates highly beneficial compressive stresses on flat, uniform surfaces.
However, consider a component with a deeply milled slot or window that leaves behind a very thin wall.
The Failure Mechanism:
When placed in a nitriding furnace, nitrogen gas attacks this thin wall from both sides simultaneously. If the wall thickness is too small, the hard case depths meet in the middle. The ductile, shock-absorbing "core" of the steel completely disappears, leaving a section that is 100% hard, brittle nitride. As the adjacent thick sections expand at a different rate, the brittle thin wall cannot flex or yield. It simply snaps at its weakest transitional edge.
The Fix:
The 3x Rule: Always ensure your minimum wall thickness is at least three times greater than your targeted effective nitriding case depth (EHT).
Local Masking: If a thin wall is mechanically mandatory, protect it from the gas. Apply an anti-nitriding stop-off paint or utilize electroplated copper masking (0.02-0.05mm thick) on the thin-walled region before it enters the furnace. The copper blocks nitrogen diffusion, preserving the tough, original alloy core beneath.
Case Study 2: SKD61 (H13) Quenching and the "Martensite Shock"
Moving from surface treatments to through-hardening, SKD61 is the undisputed king of hot-work tool steels, prized for its ability to maintain strength at elevated temperatures. However, during a full quench (heating to 1020-1050C) followed by rapid gas or oil cooling), SKD61 undergoes an incredibly violent internal transformation into a structure called Martensite.
As austenite turns into martensite, the steel experiences significant volumetric expansion.
The Failure Mechanism:
Because thin sections possess a high surface-area-to-volume ratio, they shed heat incredibly fast. During a quench, the thin wall cools first, transforming into martensite and expanding while the thick base is still hot, soft, and contracting. Hours later, as the heavy base finally cools and expands, it pulls violently against the already rigid, brittle thin section. Without immediate intervention, this creates a classic quench crack right at the internal corner geometry.
The Fix:
Unlike nitriding, you cannot simply "mask" a section of SKD61 from a quench because the entire part must be heated and cooled to achieve its properties. Instead, you must manage the thermal physics:Mandatory R-Angles (Fillets): Never leave sharp internal corners on SKD61 parts destined for a quench. Introduce a generous fillet radius (minimum $1-2\text{mm}$) at the base of all walls to distribute the phase-change stresses.
Thermal Wrapping (Shielding): Before placing the part in the vacuum furnace, skilled heat-treat technicians will pack deep slots or wrap thin walls with ceramic blankets or stainless steel foil. This insulation artificially slows down the cooling rate of the thin wall, allowing it to cool at the same speed as the thick base, neutralizing the destructive stress differential.
Immediate Tempering: SKD61 is under maximum internal tension immediately after a quench. It must be placed into a tempering furnace as soon as it cools down to a touch-safe temperature (60-80C). Delaying the temper by even a few hours invites spontaneous "desk cracking."
Summary for Production Success
By designing with the physics of heat treatment in mind, you protect your production line from catastrophic failures, reduce component waste, and build hardware that stands up to thousands of hours of rigorous operational abuse.
Always look closely at your thin sections, eliminate sharp 90 degree steps, and ensure your heat-treatment partner utilizes local masking or thermal wrapping where appropriate.
Have a complex custom screw, barrel, or mold component that needs precise hardening? Reach out to the RobotDigg engineering team today to optimize your design for production success.
Recent post:
- The Complete Guide to RobotDigg PnP Units: From SMT Assembly to Industrial Material Handling
- Mastering Precision: Choosing the Right Controller and Feeder for Your Automation Pilot
- Navigating the Perfect Storm: Why RobotDigg’s Ecosystem is Built for the New Era of Global Hardware
- The Solid-State Revolution: How SSR, SST, and SSB Are Redefining Modern Automation and Robotics
- Avoiding SMT Failures: Why Coplanarity Check is Critical for High-Yield PCB Assembly