Decoding the Desktop Label: 4 Types of Compact Plastic Machinery Explained
In the Maker community, hardware prototyping, and small-batch manufacturing, the term "Desktop Injection Molding Machine" has exploded in popularity.
However, a quick browse through the market reveals massive discrepancies in design, price, and capability. Some "desktop molders" cost a few hundred dollars and use manual levers, while precision systems like RobotDigg's micro-injection series are automated, servo-driven, and cost thousands.
The truth? Many machines marketed as desktop injection molders are actually modified extruders or simple plungers. To help engineers, makers, and DIY builders select the right setup or source the correct components (screws, barrels, and actuators), we break down the four distinct types of desktop machines on the market today.
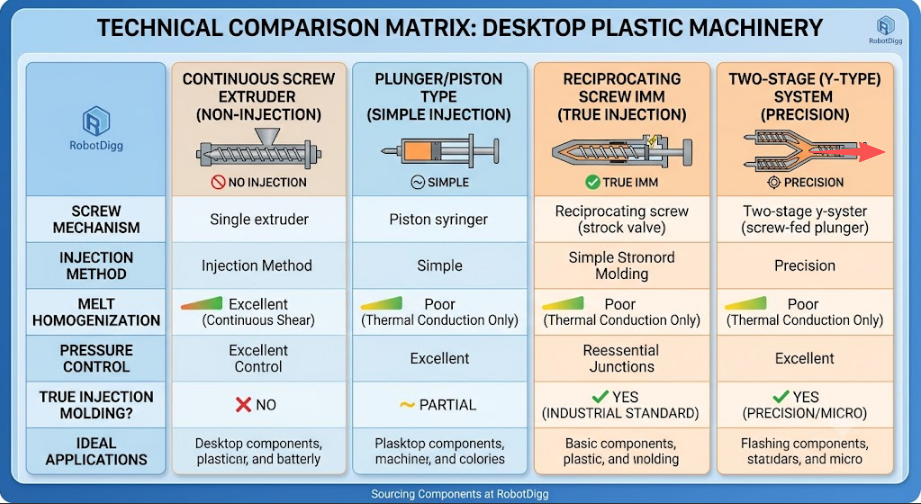
1. Continuous Screw Extruder (Not True Injection)
Industry Classification: Desktop Screw Extruder / Micro-Extruder
How it Works: The machine utilizes an extrusion screw that only rotates in a fixed axial position. It melts plastic pellets and continuously forces them out through a die or a rudimentary clamped cavity.
The Reality: This is not an injection molding machine. It lacks an injection stroke, a high-pressure velocity phase, and a holding pressure phase.
Best Used For: Producing 3D printing filament, recycling plastic shreds into continuous profiles, or basic material compounding. Attempting to fill complex molds with this method results in severe short-shots and air pockets due to the low pressure.
2. Plunger / Piston Type
Industry Classification: Plunger-Type (Piston-Driven) Injection Molder
How it Works: This design eliminates the screw entirely. Plastic pellets drop into a heated barrel where they melt purely via thermal conduction from external band heaters. A pneumatic cylinder, hydraulic ram, or mechanical lever then drives a solid piston (plunger) down the barrel like a syringe, forcing the plastic into a mold.
Pros & Cons:
Pros: Highly affordable, mechanically simple, and a favorite for open-source DIY builds.
Cons: Poor thermal homogenization. Plastic conducts heat poorly; the material touching the barrel wall can degrade or burn while the core remains cold and unmelted. It is highly prone to trapping air bubbles and cannot handle highly viscous engineering plastics.
3. Traditional Screw with Check Valve (True Injection)
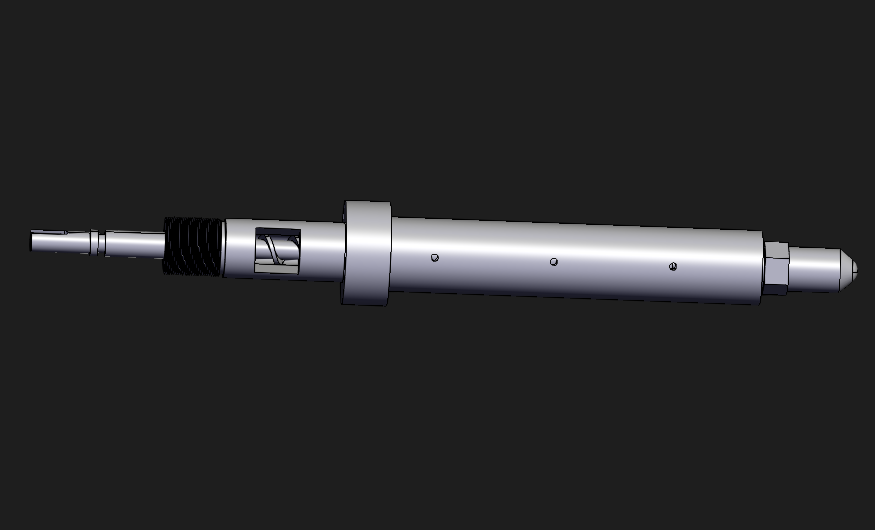
Industry Classification: Single Reciprocating Screw Injection Molding Machine (True IMM)
How it Works: This is a direct, miniature replica of standard industrial injection molding machines. It relies on a specialized screw that does two jobs by moving both rotationally and axially:
Plasticizing (Metering): The screw rotates, utilizing mechanical shear and heater bands to melt the plastic cleanly. As the molten plastic accumulates at the front of the screw, the rising pressure forces the entire screw to move backward (reciprocate) to meter an exact shot size.
Injection: The screw stops rotating. A servo motor, hydraulic press, or pneumatic actuator slams the screw forward axially like a piston, shooting the molten plastic into the mold.
The Check Valve ("Rocket Head"): Crucially, the tip of the screw features a non-return check valve. During the forward injection stroke, this ring slides shut against the screw flights, preventing the liquid plastic from backflowing down the screw channels and ensuring absolute injection and holding pressure.
Status: This is the benchmark for true desktop manufacturing. High-end, automated desktop molders (such as RobotDigg’s servo-driven benchtop units) utilize this exact architecture to achieve industrial-grade part strength and precision.
4. Y-Type Structure (Two-Stage System)
Industry Classification: Two-Stage (Screw-Preplasticizer / Plunger-Injection) Machine
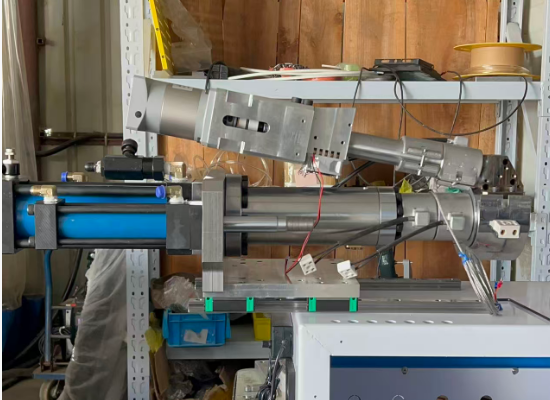
How it Works: This design splits the melting and the injecting into two separate components, often arranged in a V or Y configuration.
Stage 1: A dedicated extrusion screw rotates at a fixed axial position solely to melt and homogenize the polymer.
Stage 2: The screw feeds the perfectly melted plastic into a separate shooting cylinder equipped with a precision plunger. Once the desired shot volume is achieved, the plunger fires the material into the mold.
Pros & Cons:
Pros: Superior melt quality because the screw can be optimized purely for plasticizing without having to slide back and forth. It offers highly repeatable, ultra-precise shot sizes—making it a staple for micro-molding medical or electronic components.
Cons: High mechanical complexity, a larger footprint, and significantly higher manufacturing and maintenance costs.
For engineers looking to build or buy a benchtop setup:
If your goal is recycled plastic hobby work or simple shapes, a Plunger Type (Type 2) or basic manual lever machine is a low-cost entry point.
If your goal is functional prototyping, testing standard specimens (tensile bars), or small-scale commercial production, look exclusively for a Reciprocating Screw Machine or Y-stage (Type 3) equipped with a proper check valve assembly. Ensure you source high-quality nitrided or bi-metallic miniature screws (typically 14mm to 20mm in diameter) alongside robust linear guides and high-torque motors to handle the dynamic loads of true injection cycles.
Recent post:
- Navigating the Perfect Storm: Why RobotDigg’s Ecosystem is Built for the New Era of Global Hardware
- The Solid-State Revolution: How SSR, SST, and SSB Are Redefining Modern Automation and Robotics
- Avoiding SMT Failures: Why Coplanarity Check is Critical for High-Yield PCB Assembly
- Embracing the Crunch: Mastering Heat Treatment and Geometry for SKD61 and Nitrided Steels
- Choosing the Right Extruder Toolchain: Single-Screw, Vertical, and Twin-Screw Solutions